Richie's Little Tank

Re: Richie's Little Tank
Thanks Richie. The engine in the video sounds really sweet - hope yours is as good!
1 in 10 people understands binary. The other one doesn't

Re: Richie's Little Tank
There is a lot of duff information on wiki about them, but it gives a very generalised run down of the carrier.
My carrier is a Canadian built universal carrier no.3 Mk1 built November 1942, war department number CT 54508. If it had been British it would have been T54508 (the C stands for "Canadian")
When the carrier production kicked into high gear which was at the end of 41 into 42, vickers farmed out the work to other firms such as Wollesley, sentinel wagon, ford, etc etc. the carriers were all built to British spec (except the crude Aussie LP carriers)
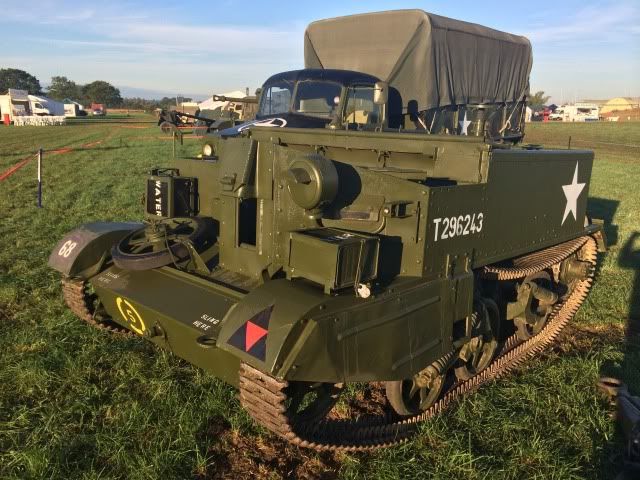
The carriers role is so diverse, from assault vehicle, to mortar platform, to flame thrower, to ambulance ! And weighing in under 4.5 tonnes the vehicle was air portable too.
Here is a nicely restored version of mine
http://youtu.be/owpPZCc77wY
And some Newzealanders playing with a universal carrier, followed by a Loyd carrier in the bush
http://youtu.be/9mgU9apMuFQ
The paint scheme on the universal carrier is as per the orders for Italy. It's described as a light mud base with a blue/black disruptive pattern. I will paint mine this colour after the Sicily campaign which was desert sand with a brown / black disruptive. Just to follow on from where my grandad had served
The carrier was initially designed to rush a bren (basically a machine gun) firing team into battle, at which they would jump out and fight the enemy... When done the carrier would return for them and pick them up...... Yes you heard that right ! They jump out of the armoured vehicle to get shot up !!!
Here is an early news reel showing some carriers in action
http://youtu.be/GuWsy2adMfQ
My carrier is a Canadian built universal carrier no.3 Mk1 built November 1942, war department number CT 54508. If it had been British it would have been T54508 (the C stands for "Canadian")
When the carrier production kicked into high gear which was at the end of 41 into 42, vickers farmed out the work to other firms such as Wollesley, sentinel wagon, ford, etc etc. the carriers were all built to British spec (except the crude Aussie LP carriers)
The carriers role is so diverse, from assault vehicle, to mortar platform, to flame thrower, to ambulance ! And weighing in under 4.5 tonnes the vehicle was air portable too.
Here is a nicely restored version of mine
http://youtu.be/owpPZCc77wY
And some Newzealanders playing with a universal carrier, followed by a Loyd carrier in the bush
http://youtu.be/9mgU9apMuFQ
The paint scheme on the universal carrier is as per the orders for Italy. It's described as a light mud base with a blue/black disruptive pattern. I will paint mine this colour after the Sicily campaign which was desert sand with a brown / black disruptive. Just to follow on from where my grandad had served
The carrier was initially designed to rush a bren (basically a machine gun) firing team into battle, at which they would jump out and fight the enemy... When done the carrier would return for them and pick them up...... Yes you heard that right ! They jump out of the armoured vehicle to get shot up !!!
Here is an early news reel showing some carriers in action
http://youtu.be/GuWsy2adMfQ
"You can screw a man down until he takes to drinking......take me to the fantastic place..."
Re: Richie's Little Tank
The film shows how relatively fast and nimble they are - and the flamethrower role is very impressive. Might be handy down town on a Saturday night!
1 in 10 people understands binary. The other one doesn't
-
quicksilver-wsr
- Posts: 1099
- Joined: Thu Nov 26, 2009 10:29 pm
Re: Richie's Little Tank
I'm not particularly a military-vehicle fan, but I certainly would enjoy seeing photos and having periodic updates on Richie's project. With Richie being a BBP team-member, there's a direct relevance to having this on here, and - furthermore - the labours of love that these lengthy restorations undoubtedly are serve to inform and inspire in equal measure.
More power to your elbow, Richie!
The story of how this project came about is a vivid illustration of the fact that motivation for these things comes from deep down. So often, it is done in tribute to someone else.
Nigel
More power to your elbow, Richie!
The story of how this project came about is a vivid illustration of the fact that motivation for these things comes from deep down. So often, it is done in tribute to someone else.
Nigel
Re: Richie's Little Tank
This is still the way the infantry uses Armoured Personnel Carriers and Infantry Fighting Vehicles to this day - at least according to my Infanteer colleagues.Richie wrote:The carrier was initially designed to rush a bren (basically a machine gun) firing team into battle, at which they would jump out and fight the enemy... When done the carrier would return for them and pick them up...... Yes you heard that right ! They jump out of the armoured vehicle to get shot up !!!
Stay in the vehicle and all you are is a neatly packaged bunch of casualties. You jump out to take up better positions - APCs cant hide in folds in the ground, or climb to the upper stories of houses and Infantry are supposed to be, well, Infantry, not inferior tank crew.
Most people see a tracked vehicle and see a Big Tank, Small Tank, Medium Sized Tank. Someone 'in the trade' sees an Armoured Carrier, a Tracked Reconnaissance Vehicle, a Self Propelled Gun and sometimes, just sometimes, a Tank.
If the Universal carrier had been designed to be primarily a platform for fighting from, rather than a protected means of mobility, a nice big Vickers would have been mounted on it - just as fitted to some pre-war Tanks. Notice that when a Soft Skinned vehicle was used as a platform to fight from in the desert the guns fitted were somewhat more powerful than the Bren.
The thing that made the Carrier so good, and so revolutionary, was that it WASN'T a 'Small and badly designed Tank' - it was a small and highly manoeuvrable means of moving heavier equipment around that wouldn't get torn to shreds if fired on by the sort of weapons typically carried by Infantry, which meant you could operate it, and what it carried, further forward.
You could do Recce in it but in that role the armour was there to protect you against the odd Infantry position - it was speed and stealth that kept you safe.
Try and stand and fight with it and generally the enemy would bring up something designed to deal with proper Tanks, anything from a Panzerfaust to a Tiger - against any of which you wouldn't stand a hope in hell.
Re: Richie's Little Tank
beleive it or not, they changed the fighting orders during the war whereby the gunner did not dismount from the carrier. the early carden loyd carriers were fitted with the vickers machine gun, and many of the Australian carriers continued to use them over the bren.
The front armour on the mk1 carriers was 10mm thick, and was pretty much like tracing paper to anything large calibre. I have a section of front armour which I would love to shoot and see how good it actually was.
I have seen photo's of carriers struck by 88's and it pretty much slices the carrier in two along its length.
As mentioned the carriers best weapon was its speed and agility making it a hard target to snuff out when on the move.
Carriers are far from comfortable, being sat low you get the fumes and heat from the engine which is directly behind you with only a 5mm thick steel bulkhead to seperate, then with the vehicle being open topped you are at the mercy of the elements...I would hate to think what my grandad went through during his time in the desert with the extreme heat followed by the harsh winter of 1943 during the Italy campaign.
"You can screw a man down until he takes to drinking......take me to the fantastic place..."
Re: Richie's Little Tank
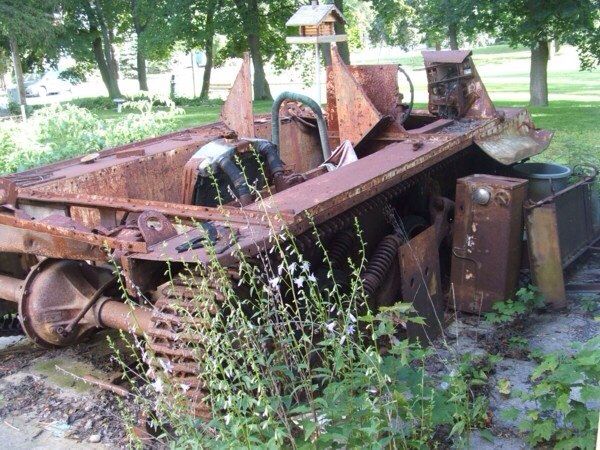
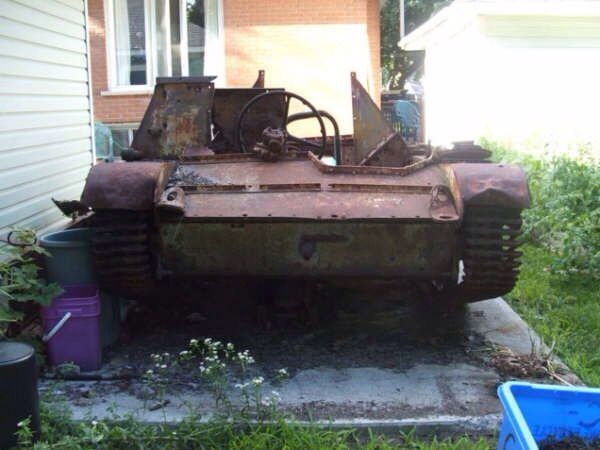
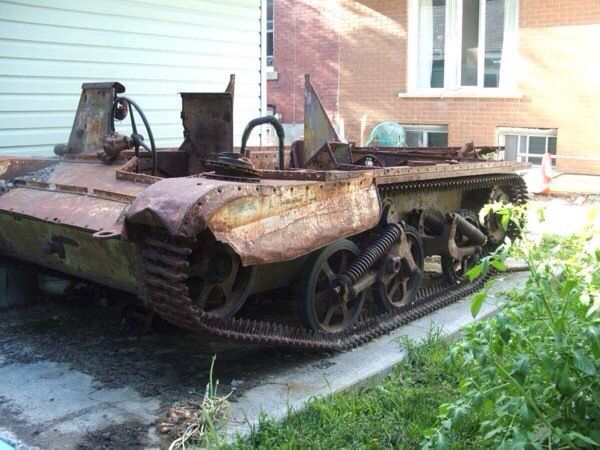
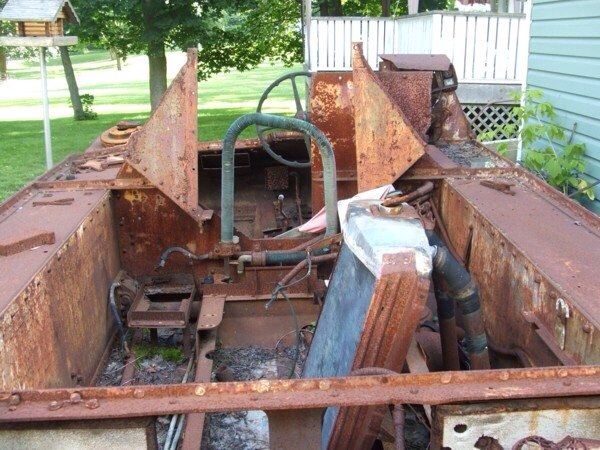
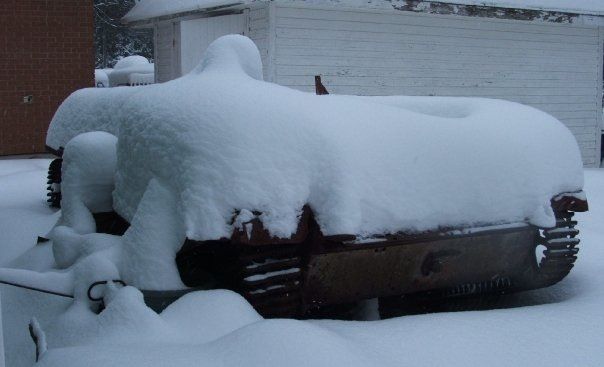
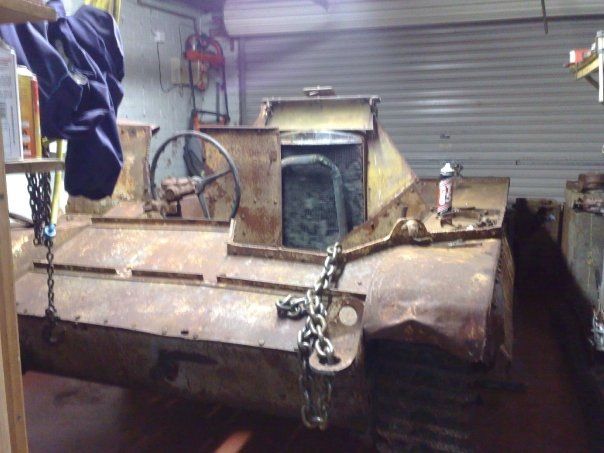
So having decided I was going to take the plunge I began my search, I quickly learned that the military vehicle fraternity are a very cloak and dagger type, locations of potential vehicles or parts are kept very secretive, even if that person does not need the vehicle or the bits, the info is seldom shared. I made a generic email giving my reasons for the project and sent it to every single military museum I could find in the UK, Europe , US, and Canada ! The process took me a year of research. I was finally guided to a chap who lives in Fergus Ontario, who told me he had the "remains of a carrier", having previously been disappointed with massive prices for a metal scrap box, i was somewhat reserved ! I asked for some pictures and the chap sent these.
I took a deep breath in and asked the price, I was hugely suprised at the quote which was ten times less than I expected. The seller was aware of my story and had bought the carrier as scrap to cut up, it had no material value to him, which was good news for me. The deal was done and three to four months later I had a carrier !

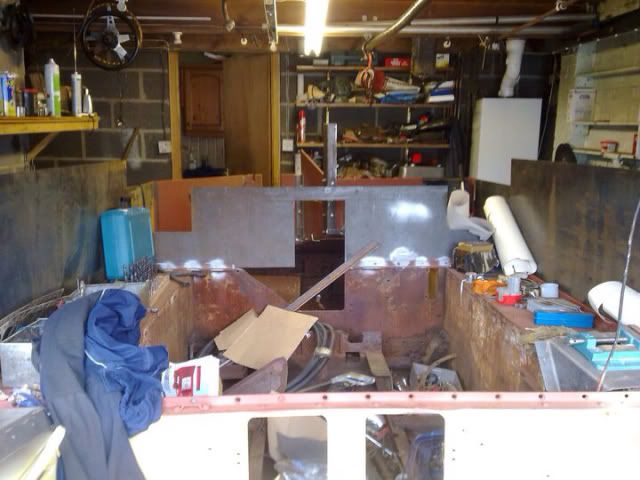
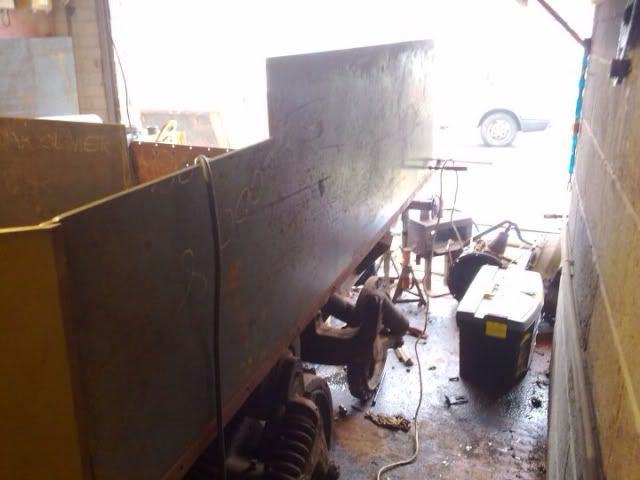
When I got the carrier home I began the long process of breaking it down, the upper armour had been cut just above the rivet line with a gas axe. At the time I was unsure of how to remove the rivets, because they had been heated and hammered into shape whilst cooling, they were very hard, and would not drill ! I elected to slice off both heads with a slitting disc and a grinder, then using a wide blade chisel or crow bar split the armour from the frame rail. The process was slow and fraught with danger ! The amount of stored energy from the rivets was amazing, each one let go with a massive BANG, it also took quite a load to brake them free, and I ended up knocked out cold when my pal was working on one side of the carrier prising some armour off with a crow bar, dispite me telling him to keep tight hold he managed to let slip and ultimately the crow bar flew over towards me just as I looked up from in the carrier hull......I got it right in the face !
I have since learned that the best method is to slit the head, heat until cherry then use a rivet gun and moyle ? Point chisel to drift them out..... Far far easier !
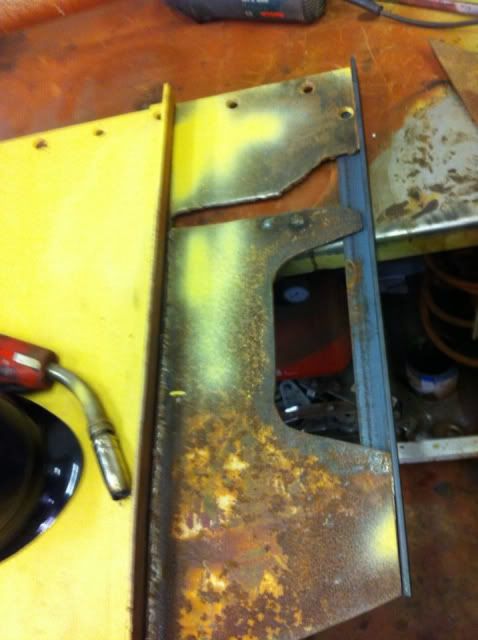
That pretty much left me with a clear view of what needed replaced. I was told I should rip out the entire centre bulkhead (behind driver) and start new, however I elected to cut the original fabric out from behind the driver, use that material to graft in the missing lower sections, then add a new top half.
(Messy worker as you can see)
I then grafted in the missing segments to the lower part of the bulkhead, then welded the new to the old which got me to this stage

The remains of the original fabric from the bulkhead was used to make a graft on the glacis plate (front sloped sheet that covers the drivers legs
You can see I am not a welder ! This was the first time I had used a mig, and I was self taught, my father taught me how to oxy weld which I am OK at.... Note the two welded plugs which were previously holes to mount the drivers seat backrest. By bluebird standards this was probably sacrilege but I had to plan within my means, and I justified my actions as being any material chopped out was re introduced to the carrier.... All be it in a different location
Pressed on and dressed off my shocking welds, I flashed over with red oxide to see if I had hidden it well enough which I was quite happy with..... Paint was still wet here... I later filled the notch at the top edge.
Well my fingers are tired now so that will do until tomorrow
I took a deep breath in and asked the price, I was hugely suprised at the quote which was ten times less than I expected. The seller was aware of my story and had bought the carrier as scrap to cut up, it had no material value to him, which was good news for me. The deal was done and three to four months later I had a carrier !
When I got the carrier home I began the long process of breaking it down, the upper armour had been cut just above the rivet line with a gas axe. At the time I was unsure of how to remove the rivets, because they had been heated and hammered into shape whilst cooling, they were very hard, and would not drill ! I elected to slice off both heads with a slitting disc and a grinder, then using a wide blade chisel or crow bar split the armour from the frame rail. The process was slow and fraught with danger ! The amount of stored energy from the rivets was amazing, each one let go with a massive BANG, it also took quite a load to brake them free, and I ended up knocked out cold when my pal was working on one side of the carrier prising some armour off with a crow bar, dispite me telling him to keep tight hold he managed to let slip and ultimately the crow bar flew over towards me just as I looked up from in the carrier hull......I got it right in the face !
I have since learned that the best method is to slit the head, heat until cherry then use a rivet gun and moyle ? Point chisel to drift them out..... Far far easier !
That pretty much left me with a clear view of what needed replaced. I was told I should rip out the entire centre bulkhead (behind driver) and start new, however I elected to cut the original fabric out from behind the driver, use that material to graft in the missing lower sections, then add a new top half.
(Messy worker as you can see)
I then grafted in the missing segments to the lower part of the bulkhead, then welded the new to the old which got me to this stage
The remains of the original fabric from the bulkhead was used to make a graft on the glacis plate (front sloped sheet that covers the drivers legs
You can see I am not a welder ! This was the first time I had used a mig, and I was self taught, my father taught me how to oxy weld which I am OK at.... Note the two welded plugs which were previously holes to mount the drivers seat backrest. By bluebird standards this was probably sacrilege but I had to plan within my means, and I justified my actions as being any material chopped out was re introduced to the carrier.... All be it in a different location
Pressed on and dressed off my shocking welds, I flashed over with red oxide to see if I had hidden it well enough which I was quite happy with..... Paint was still wet here... I later filled the notch at the top edge.
Well my fingers are tired now so that will do until tomorrow
Last edited by Richie on Fri Dec 13, 2013 5:18 pm, edited 1 time in total.
"You can screw a man down until he takes to drinking......take me to the fantastic place..."
Re: Richie's Little Tank
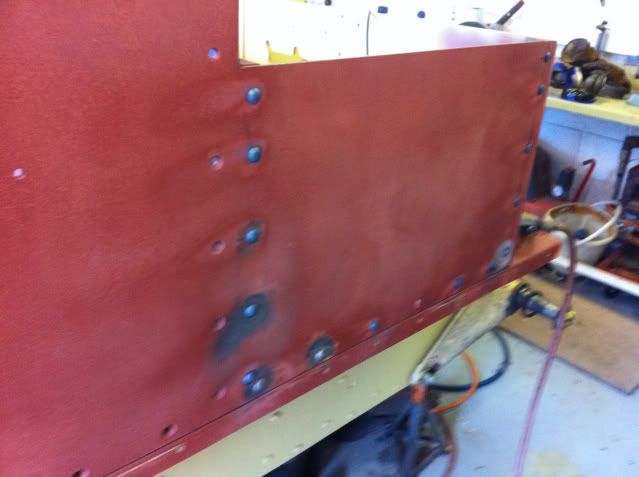
Having fettled the centre bulkhead I now set about making the armour. This consisted of ringing people all over the globe along with numerous trips down south to measure each plate, and also plot all the holes. I ended up getting a wide band roll of backing paper which I taped onto the armour then plotted every rivet and hole, I then labelled up what each point was.. Once that was done I made a full set of armour out of ply wood which I bolted back to the carrier. Once happy that everything seemed to be correct I placed a rather hefty order for some 10mm thick steel plate for the front armour, and 8mm plate for the rear and sides.
As all of the upright frame rails had been cut out, I had to weld in new ones, or graft in missing segments of the lower rail, which took some time as most of the size stock used back in the day is no longer available so it was time consuming and costly to replicate the original material.
When the plate work finally arrived I had to lift the plates into the carrier and clamp them in situ so I could get the holes plotted for the lower rivets
It was then a case of removing the plate then drilling the holes... This was where I realised that the cost of the project should not just be meaured in time and materials, but also tooling ! I knew I had a large number of holes to drill (10mm holes mainly) and getting them true and level would be a task, the best tool for the job being a mag drill.. It took me six months to save up for the £400 drill ! Which packed up recently and needs an overhaul.

Once drilled I then had to go around with a cobalt countersink tool and countersink every hole in preparation for the rivets to be set. I was still plucking up the courage to do the rivets, but took the plunge in the end. The snaps were made here at bbhq by Bill, the snap is the tool used to form the correct shape head on the rivet when setting. Unlike aircraft rivets which have the finished head on the outside and the tail compressed on the inside, on a carrier the finished dome head is on the inside, and the head to be peened/formed is on the outside. Then using the snap and the rivet hammer you squeeze the hot rivet into the countersink, it then cools and contracts squeezing the plate onto the frame rail. You have to be spot on with the heat, and setting allowances are crucial !
The rivets are all 3/8 shank or 5/16 for the smaller ones, so we needed three snaps for the different shaped heads. I give bill three examples of the finished rivets and off he went on the lathe. The steel used was a high grade high carbon EN24T steel. Each snap takes nigh on a day to machine, at which point it was then taken back to my workshop and placed into the farriers forge for hardening . Then returned to bill for polishing.....

Normally riveting of this type is a three person job, one to manage the forge and place the rivet, one to hammer, one to block. Due to staffing issues I only had myself and a willing...ish victim so I opted for oxy propane torch then the block man placed the rivet, set himself on the backside of it with the block tool, and I hammered the tail to shape. I burnt a number of my first rivets, but have the knack down now.
First rivets going in
http://youtu.be/NKBXa9PaSZM
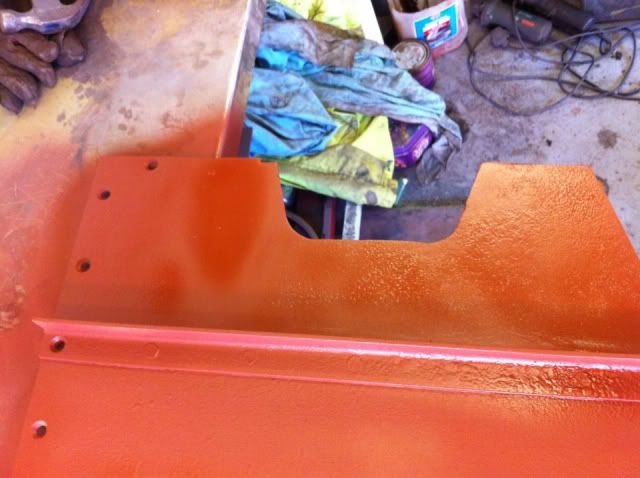
Once done they were flashed over in red oxide primer
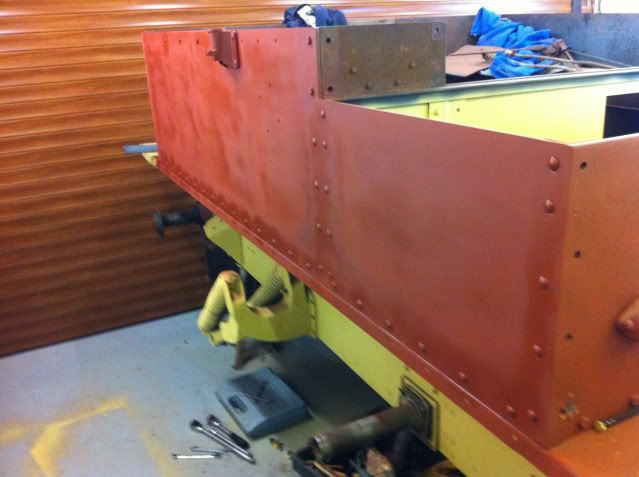
And then flashed over in a layer of base coat
Here is an original carrier (Mk2)
The carrier is 99% riveted now! just a few 5/16th for the ducts and the odd 3/8 here and there, but from where I started at this point the carrier had come quite a long way.
As all of the upright frame rails had been cut out, I had to weld in new ones, or graft in missing segments of the lower rail, which took some time as most of the size stock used back in the day is no longer available so it was time consuming and costly to replicate the original material.
When the plate work finally arrived I had to lift the plates into the carrier and clamp them in situ so I could get the holes plotted for the lower rivets
It was then a case of removing the plate then drilling the holes... This was where I realised that the cost of the project should not just be meaured in time and materials, but also tooling ! I knew I had a large number of holes to drill (10mm holes mainly) and getting them true and level would be a task, the best tool for the job being a mag drill.. It took me six months to save up for the £400 drill ! Which packed up recently and needs an overhaul.
Once drilled I then had to go around with a cobalt countersink tool and countersink every hole in preparation for the rivets to be set. I was still plucking up the courage to do the rivets, but took the plunge in the end. The snaps were made here at bbhq by Bill, the snap is the tool used to form the correct shape head on the rivet when setting. Unlike aircraft rivets which have the finished head on the outside and the tail compressed on the inside, on a carrier the finished dome head is on the inside, and the head to be peened/formed is on the outside. Then using the snap and the rivet hammer you squeeze the hot rivet into the countersink, it then cools and contracts squeezing the plate onto the frame rail. You have to be spot on with the heat, and setting allowances are crucial !
The rivets are all 3/8 shank or 5/16 for the smaller ones, so we needed three snaps for the different shaped heads. I give bill three examples of the finished rivets and off he went on the lathe. The steel used was a high grade high carbon EN24T steel. Each snap takes nigh on a day to machine, at which point it was then taken back to my workshop and placed into the farriers forge for hardening . Then returned to bill for polishing.....
Normally riveting of this type is a three person job, one to manage the forge and place the rivet, one to hammer, one to block. Due to staffing issues I only had myself and a willing...ish victim so I opted for oxy propane torch then the block man placed the rivet, set himself on the backside of it with the block tool, and I hammered the tail to shape. I burnt a number of my first rivets, but have the knack down now.
First rivets going in
http://youtu.be/NKBXa9PaSZM
Once done they were flashed over in red oxide primer
And then flashed over in a layer of base coat
Here is an original carrier (Mk2)
The carrier is 99% riveted now! just a few 5/16th for the ducts and the odd 3/8 here and there, but from where I started at this point the carrier had come quite a long way.
"You can screw a man down until he takes to drinking......take me to the fantastic place..."
Re: Richie's Little Tank
It's looking really good so far Richie - well worth the effort and care. Hot riveting - I K Brunel would be proud!
Is the engine running, or is that the next stage after the bodywork?
Is the engine running, or is that the next stage after the bodywork?
1 in 10 people understands binary. The other one doesn't
Re: Richie's Little Tank
The engine was seized from standing, I sent it to Lincoln to get rebuilt but ended up being ripped off and bits of my engine stolen. The engine is in bits needing a rebuild. The mains on the crank are shot so it will need a re grind and new bearings.
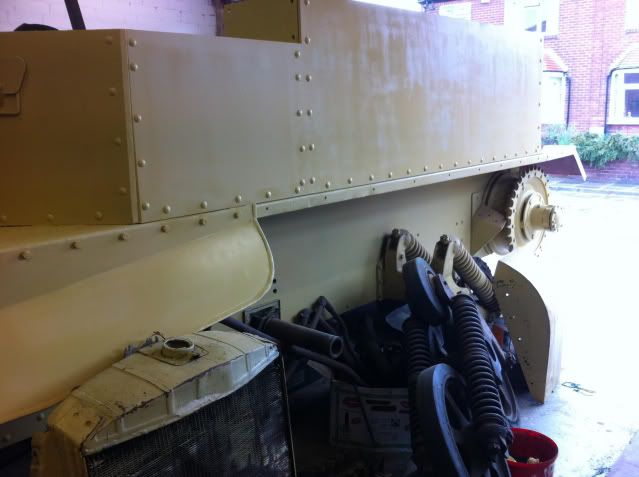
That will be job one in the new year ! Bodywork wise I need to rebuild the air intake ducts and the armoured radio battery box which sits on the rear armour.
Not to mention a plethora of tins and bin boxes which are fitted inside the thing.
That will be job one in the new year ! Bodywork wise I need to rebuild the air intake ducts and the armoured radio battery box which sits on the rear armour.
Not to mention a plethora of tins and bin boxes which are fitted inside the thing.
Last edited by Richie on Fri Dec 13, 2013 3:16 pm, edited 1 time in total.
"You can screw a man down until he takes to drinking......take me to the fantastic place..."